Tuesday, September 2, 2008

Tuesdays With Dorie 8: Chunky Peanut Butter Oatmeal Chocolate Chipsters


Tuesdays with Dorie again! This week's recipe was chosen by Stefany of Proceed with Caution. These cookies may have the longest name in the world, but they are very simple to make. I quite like making cookies every week, because it doesn't require too much effort if you are busy, but they are so satisfying! For these cookies, I baked a tray of 6, then I put the rest of the dough, rolled into a long, into the freezer. I haven't done that before, but it was great being able to cut off a few cookies when I wanted them, and eat them freshly baked. I found it quite hard to actually cut the cookies off the log though, so I was thinking that next time I'll freeze the cookies already cut into single cookies so I can just put them straight onto the baking tray- no cutting involved! I found these cookies are nice and crispy straight out of the oven, but after a few hours they become a bit soft. So I have really warmed to this idea of freezing the dough. It's also good for the hips because I'm not 'forced' into eating all the cookies at once, while they are at their best.

Overall I enjoyed these cookies- not my favourite but still tasty. The nutmeg really shone through.


Monday, September 1, 2008

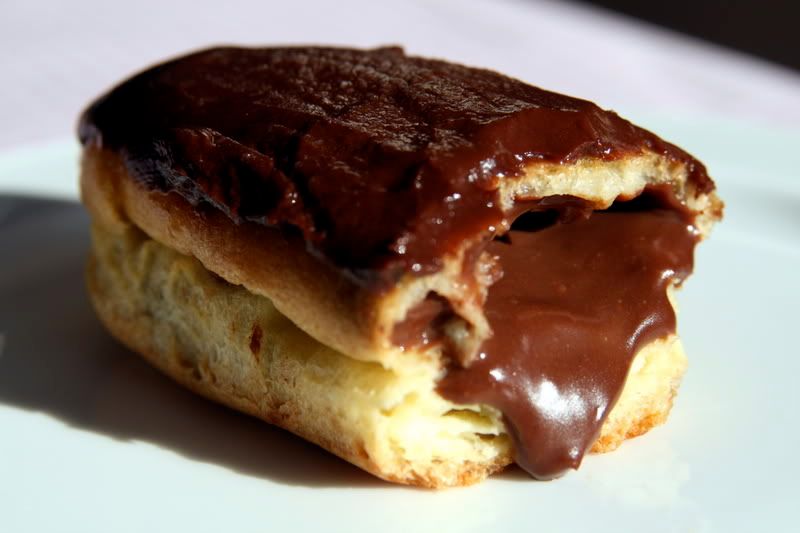
Daring Bakers 3: Chocolate Eclairs


Not again! I am posting this one day late (in my part of the world), as I did last month too. I have been waiting to post this month's Daring Bakers challenge for weeks, and when the day finally arrives it simply slips my mind? Anyway, I'm here now!

This month's hosts were Tony Tahhan and MeetaK, and what a fantastic challenge it was. I've said it once but i'll say it again- I love the variety of things I am baking now. Before I would usually stick to the same old things, so it has been great! I was over the moon when I saw this month's challenge was Chocolate Eclairs by none other than the God of pastry himself- Pierre Herme (insert cheering). Could my month get any better? I love Pierre Herme, I love chocolate, I love eclairs and I have never got around to making choux pastry before.

Usually I can't wait and I'll pretty much do the challenge as soon as it's posted, but this month I was a little busy and had to wait a couple of weeks. After reading people's comments and frustrations I must admit I was genuinely scared. Well, there must be a reason I haven't attempted choux pastry before! From what I had heard beforehand, choux pastry is relatively simple to make. Fear aside I went ahead and made sure I had read every problem people had had, and also many tips ensuring perfect eclairs. I must have missed something... My first batch puffed up beautifully in the oven, but as soon as I took them out they collapsed into a soggy mess! A combination I think of my eclairs being too big and not enough cooking time. Ahh well... my second attempt proved much more fruitful. I made the eclairs smaller and made sure they were well baked before removing them. Once they were out of the oven I made a small incision to let the steam out (to prevent them from going soggy). Next time I need to work on making the eclairs more uniform in shape. It was really hard to pipe the choux pastry uniformly. Tartlette suggested piping one long line of choux pastry, freezing it, then cutting it into your eclair shapes. Good idea- i'll be doing this next time (though the idea of piping one huge line the same thickness is worrying since I couldn't even pipe little 10cm lines very well). Choux pastry down, chocolate glaze and chocolate pastry cream to go...

I've made pastry cream before so I wasn't too concerned. This recipe from Pierre Herme is absolutely delicious! Not that I ever doubted him. I made the pastry cream in advance to make my time baking these easier. Thankfully I did because I had so much trouble with the chocolate glaze...

My first attempt at the glaze was going well. Until I added the chocolate sauce to the chocolate glaze. It split! Horribly so... there was no way it could be saved. What a shame, because Valrhona isn't exactly cheap. On my second attempt, I made sure I paid close attention to every detail so as to avoid my previous mishap. Well the pastry God's were not on my side and my chocolate glaze split once again. Just like my first attempt- when I added the chocolate sauce to the chocolate glaze... I was not going to waste anymore Valrhona so I ended up just topping the eclairs with a ganache. I think the glaze would have been wonderful had it worked out though. From what I gather, I may have been going wrong with the melting of the chocolate and butter together? Maybe I had it on too high a heat and it was splitting from then? Honestly I am not too sure...

Overall they tasted delicious! Well worth the wait...


Pierre Hermé’s Chocolate Éclairs
Recipe from Chocolate Desserts by Pierre Hermé
(makes 20-24 Éclairs)

• Cream Puff Dough (see below for recipe), fresh and still warm

1) Preheat your oven to 375 degrees F (190 degrees C). Divide the oven into thirds by
positioning the racks in the upper and lower half of the oven. Line two baking sheets with
waxed or parchment paper.

2) Fill a large pastry bag fitted with a 2/3 (2cm) plain tip nozzle with the warm cream puff dough.
Pipe the dough onto the baking sheets in long, 4 to 41/2 inches (about 11 cm) chubby fingers.
Leave about 2 inches (5 cm) space in between each dough strip to allow them room to puff.
The dough should give you enough to pipe 20-24 éclairs.

3) Slide both the baking sheets into the oven and bake for 7 minutes. After the 7 minutes, slip the
handle of a wooden spoon into the door to keep in ajar. When the éclairs have been in the
oven for a total of 12 minutes, rotate the sheets top to bottom and front to back. Continue
baking for a further 8 minutes or until the éclairs are puffed, golden and firm. The total baking
time should be approximately 20 minutes.

Notes:
1) The éclairs can be kept in a cool, dry place for several hours before filling.

Assembling the éclairs:

• Chocolate glaze (see below for recipe)
• Chocolate pastry cream (see below for recipe)

1) Slice the éclairs horizontally, using a serrated knife and a gently sawing motion. Set aside the
bottoms and place the tops on a rack over a piece of parchment paper.

2) The glaze should be barely warm to the touch (between 95 – 104 degrees F or 35 – 40
degrees C, as measured on an instant read thermometer). Spread the glaze over the tops of
the éclairs using a metal icing spatula. Allow the tops to set and in the meantime fill the
bottoms with the pastry cream.

3) Pipe or spoon the pastry cream into the bottoms of the éclairs. Make sure you fill the bottoms
with enough cream to mound above the pastry. Place the glazed tops onto the pastry cream
and wriggle gently to settle them.

Notes:
1) If you have chilled your chocolate glaze, reheat by placing it in a bowl over simmering water,
stirring it gently with a wooden spoon. Do not stir too vigorously as you do not want to create
bubbles.

2) The éclairs should be served as soon as they have been filled.

Pierre Hermé’s Cream Puff Dough
Recipe from Chocolate Desserts by Pierre Hermé
(makes 20-24 Éclairs)

• ½ cup (125g) whole milk
• ½ cup (125g) water
• 1 stick (4 ounces; 115g) unsalted butter, cut into 8 pieces
• ¼ teaspoon sugar
• ¼ teaspoon salt
• 1 cup (140g) all-purpose flour
• 5 large eggs, at room temperature

1) In a heavy bottomed medium saucepan, bring the milk, water, butter, sugar and salt to the
boil.

2) Once the mixture is at a rolling boil, add all of the flour at once, reduce the heat to medium
and start to stir the mixture vigorously with a wooden spoon. The dough comes together very
quickly. Do not worry if a slight crust forms at the bottom of the pan, it’s supposed to. You
need to carry on stirring for a further 2-3 minutes to dry the dough. After this time the dough
will be very soft and smooth.

3) Transfer the dough into a bowl of a mixer fitted with the paddle attachment, or using your
handmixer or if you still have the energy, continue by hand. Add the eggs one at a time,
beating after each egg has been added to incorporate it into the dough.
You will notice that after you have added the first egg, the dough will separate, once again do
not worry. As you keep working the dough, it will come back all together again by the time you
have added the third egg. In the end the dough should be thick and shiny and when lifted it
should fall back into the bowl in a ribbon.

4) The dough should be still warm. It is now ready to be used for the éclairs as directed above.

Notes:
1) Once the dough is made you need to shape it immediately.

2) You can pipe the dough and the freeze it. Simply pipe the dough onto parchment-lined baking
sheets and slide the sheets into the freezer. Once the dough is completely frozen, transfer the
piped shapes into freezer bags. They can be kept in the freezer for up to a month.

Chocolate Pastry Cream
Recipe from Chocolate Desserts by Pierre Hermé

• 2 cups (500g) whole milk
• 4 large egg yolks
• 6 tbsp (75g) sugar
• 3 tablespoons cornstarch, sifted
• 7 oz (200g) bittersweet chocolate, preferably Velrhona Guanaja, melted
• 2½ tbsp (1¼ oz: 40g) unsalted butter, at room temperature

1) In a small saucepan, bring the milk to a boil. In the meantime, combine the yolks, sugar and cornstarch together and whisk in a heavy‐bottomed saucepan.

2) Once the milk has reached a boil, temper the yolks by whisking a couple spoonfuls of the hot milk into the yolk mixture.Continue whisking and slowly pour the rest of the milk into the tempered yolk mixture.

3) Strain the mixture back into the saucepan to remove any egg that may have scrambled. Place the pan over medium heat and whisk vigorously (without stop) until the mixture returns to a boil. Keep whisking vigorously for 1 to 2 more minutes (still over medium heat).Stir in the melted chocolate and then remove the pan from the heat.

4) Scrape the pastry cream into a small bowl and set it in an ice‐water bath to stop the cooking process. Make sure to continue stirring the mixture at this point so that it remains smooth.

5) Once the cream has reached a temperature of 140 F remove from the ice‐water bath and stir in the butter in three or four installments. Return the cream to the ice‐water bath to continue cooling, stirring occasionally, until it has completely cooled. The cream is now ready to use or store in the fridge.

Notes:
1) The pastry cream can be made 2‐3 days in advance and stored in the refrigerator.

2) In order to avoid a skin forming on the pastry cream, cover with plastic wrap pressed onto the cream.

3) Tempering the eggs raises the temperature of the eggs slowly so that they do not scramble.

Chocolate Glaze
Recipe from Chocolate Desserts by Pierre Hermé
(makes 1 cup or 300g)

• 1/3 cup (80g) heavy cream
• 3½ oz (100g) bittersweet chocolate, finely chopped
• 4 tsp (20 g) unsalted butter, cut into 4 pieces, at room temperature
• 7 tbsp (110 g) Chocolate Sauce (recipe below), warm or at room temperature

1)In a small saucepan, bring the heavy cream to a boil. Remove from the heat and slowly begin to add the chocolate, stirring with a wooden spoon or spatula.

2) Stirring gently, stir in the butter, piece by piece followed by the chocolate sauce.

Notes:
1) If the chocolate glaze is too cool (i.e. not liquid enough) you may heat it briefly
 in the microwave or over a double boiler. A double boiler is basically a bowl sitting over (not touching) simmering water.

2) It is best to glaze the eclairs after the glaze is made, but if you are pressed for time, you can make the glaze a couple days ahead of time, store it in the fridge and bring it up to the proper temperature (95 to 104 F) when ready to glaze.

Chocolate Sauce
Recipe from Chocolate Desserts by Pierre Hermé
(makes 1½ cups or 525 g)

• 4½ oz (130 g) bittersweet chocolate, finely chopped
• 1 cup (250 g) water
• ½ cup (125 g) crème fraîche, or heavy cream
• 1/3 cup (70 g) sugar

1) Place all the ingredients into a heavy‐bottomed saucepan and bring to a boil, making sure to stir constantly. Then reduce the heat to low and continue stirring with a wooden spoon until the sauce thickens.

2) It may take 10‐15 minutes for the sauce to thicken, but you will know when it is done when it coats the back of your spoon.

Notes:
1) You can make this sauce ahead of time and store it in the refrigerator for two weeks. Reheat the sauce in a microwave oven or a double boiler before using.
2) This sauce is also great for cakes, ice-cream and tarts.

Saturday, August 30, 2008

Truffle!


In our house, I'm the baker and S is the cook.  While I think I have the better deal in never having to cook, I know S secretly thinks the same about me (he has a sweet tooth).  Thankfully we both love good food so we have every area covered (sweet and savoury).  

Now, since this is my blog, I was a little hesitant to write this post.  My little blog is for all things sweet (or baked) not savoury!  But this savoury dish is no ordinary dish so I couldn't resist (not to mention I really want to stop S from continuously nagging me about it!).


Truffles have become a big thing in Australia in the past few years but I wouldn't say people are cooking with them at home. Truffle oil? Yes.  But it doesn't compare to the real thing. Truffle oil has this distinct burst of truffle flavour, but you don't get all the different dimensions of flavour a real truffle has.  They are much more subtle than the oil, in a good way.  

A place in Western Australia, called Manjimup, has been growing truffles for a few years now, making it much easier to get your hands on one these days.  Well actually, we did have to pre order our truffle and we only just made the deadline for the last shipment of the season (they arrive within 48 hours of being plucked from the ground- across country).  Let's not even talk about price...  Anyway it is great that we can get our own truffles here in Australia; though I am longing to try a white truffle.  

Truffle in hand, it was time to decide what we were going to do with it.  Who am I kidding?  We had planned out the menu long before the truffle arrived and had even cleared our schedule to make sure we could enjoy our truffle marathon.  We chose to do a truffle risotto (cliche?) and truffle scrambled eggs.  We wanted to do dishes where we could really appreciate the flavour of the truffle.  We put the arborio rice into the bag with the truffle to let it infuse.  We also did this with the eggs.  It's amazing how much the scent infused!  We actually had enough truffle left to do an omlette with truffle the next day but changed our mind.  The eggs had only been in the bag with the truffle for 15 minutes so I thought they would be fine to pop back into the fridge to use later.  Well... when I went to make a cake the next day, as soon as I cracked open the egg, all I could smell was truffle!  Luckily it hadn't been in there long enough for the flavour to absorb.

The scrambled eggs were served on homemade bagels.  In Australia all I can seem to find are bread rolls with holes in the middle, claiming to be bagels.


Tuesday, August 26, 2008

Tuesdays With Dorie 7: Chocolate-Banded Ice Cream Torte


Oh dear... it seems that all of my post titles contain the words "Tuesdays With Dorie" lately!  Between Tuesdays with Dorie and Daring Bakers I don't find much time (or reason) to bake any more than that.  I promise though, I will try my best to add a few of my own things here as much as I can!  

Anyway, this week's recipe was chosen by Amy of Food, Family, and Fun.  Well, when I saw this recipe was chosen I was ecstatic!  I flip through Baking: from my home to yours, quite frequently, and this is something I always drool over.  For some reason I thought it would be on the difficult side to make, but in reality it is very simple (just time consuming).  I love the visual impact of this dessert too and also the endless possibilities of flavour creations!  When Summer comes around I'm sure I'll be making this all the time.

As always, I decided to go with mini sized ice cream tortes.  It would be fine to make the full size torte as you can just slice off pieces as you need them, but mini desserts are just so damn cute.  I also planned to make them for friends coming to dinner, so the individual portions seemed appropriate (even if the minis were still too much for one person; us girls went halves in one, while the boys almost exploded trying to finish their individual tortes!).  

At first I was going to use Dorie's Burnt Sugar Ice Cream, but I wasn't sure if our guests would like the taste (we personally love it), so I went with the original recipe suggested and made Raspberry Ice Cream.  I left out the raspberry liqueur though.  Next time, if I made raspberry again (so many flavours, so little time) I would probably omit the raspberry seeds.  S said they added to the texture but I prefer my ice cream to be as smooth as possible.  I would just make up a raspberry compote and discard the seeds. 

The chocolate truffle layer was so delicious!  I was initially concerned with the recipe but got over that pretty quick once I tasted it.  Yum!  We were saying we would even just like to eat it like chocolate custard.  The only annoying thing with the chocolate truffle cream was that it melted so quickly!  It was hard to get the base of the springform cake tin off the bottom of the truffle cream whilst still keeping it in tact.  Maybe it would work better if the ice cream was on the bottom... wouldn't look as good though!

To get really smooth layers with no bubbles I think the ice cream and the truffle cream need to be quite soft when layering them.  I was worried about melting my ice cream too much as I didn't want it to go icy.  So it was hard to make each layer really smooth.  Dorie suggests you leave at least 30 minutes in the freezer between doing each layer, but because I was quite busy the day I made it, I just kept adding layers when I got home/had time.  So don't feel you need to do it all at once!

Wish I had got an inside shot of the torte but the truffle cream melted too quickly for the slices to look decent.

Might I just add that it was also the first time I have ever used my hairdryer as a kitchen appliance (worked a treat though).

Tuesday, August 19, 2008

Tuesdays With Dorie 6: Granola Grabbers


This week's Tuesdays With Dorie came around so fast! Usually I've completed it not long after we find out what it is, especially now since we are now finding out the recipes two at a time (which is great might I just say). The Granola Grabbers were chosen by Michelle of Bad Girl Baking.

Even though this is not something I would usually bake, I still thought I would enjoy these since I love muesli (our version of granola?). And I was right! They are really yummy- a great snack. I was positive that S wouldn't like these but I was wrong- he actually really enjoyed them (eating three in a row). Seeing as there is only one egg in the recipe, I thought halving it would be too hard so I made the whole batch, which is far too many biscuits for us! When we found out the recipes, I told my friend D Dogg (there's a story behind that name...) that I would give him some, but he turned his nose up at that idea. Oh well... I think I'll force him to take some when I see him tomorrow. I did take a couple to give my Grandad this morning but he announced to me that he didn't really like it and that his wife would much prefer it (he has dementia so I forgive him!).

After reading some people's ideas, I added some choc chips on top of a few of the biscuits, but I wasn't a massive fan. We love chocolate, but thought it detracted from the other ingredients, which were delicious by themselves. I couldn't find (or didn't know what it was) wheat germ so I added semolina instead. Seemed to work fine.

Maybe I made my biscuits too big but I certainly didn't get 40 like Dorie suggests. I think I got about 25 or so. I imagine they would last longer than the 3 days Dorie suggests too.


Tuesday, August 12, 2008

Tuesdays With Dorie 5: Blueberry Sour Cream Ice Cream

When I first got Dorie Greenspan's cookbook "Baking: from my home to yours" and flicked through it, the first recipe that really stood out to me was the Blueberry Sour Cream Ice Cream. It just sounded so delicious. So you can imagine how excited I was when it was finally chosen as this weeks challenge! (Thanks to Dolores of Chronicles in Culinary Curiousity)

When I bought my Kitchenaid, there was a special promotion on and I got the ice cream attachment bowl for free. I have to say that it's really good. We have a normal ice cream machine too (a fairly good one too) but I much prefer to use the Kitchenaid ice cream bowl. Really I don't know why I don't make more ice cream. I guess because it's Winter here at the moment, ice cream isn't really at the top of my list for desserts. So a note to myself... Make more ice cream come Summer!

This ice cream was really easy to make since it isn't custard base. I was concerned it would turn out icy (more on that later). Well the first time I made this (last week) it turned out really great. Not at all icy. The only thing is we weren't patient enough to wait for it to fuly freeze, so it was a little soft. It is incredibly rich though so by the end of it, we were both feeling really sick. I tried telling S that there was actually enough ice cream for more than two serves but he insisted on serving it ALL up at once. He was sorry afterwards. Since we were so eager to eat it and it was so delicious, we didn't bother taking any photos the first time (as we were planning on making it again before the deadline). What a shame...

The second lot was a mess! I'm not sure what happened exactly, because I made it exactly the same way. It was really icy, but not in a granita icy way, it was an icy-gluey mess. I can't really describe the texture properly, but lets just say it wasn't pleasant! Maybe the cream split? Or I churned it for too long? Even though it didn't work I am still going to post pictures of the second batch. So a lesson learned- resist the temptation to dig right in; take photos first!


Tuesday, August 5, 2008

Tuesdays With Dorie 4: Black and White Banana Loaf


Wow! I can't believe this is my fourth Tuesdays With Dorie! Time is going by so fast, it's a little scary...

I have to say that I was pretty disappointed with this weeks challenge. I am not a huge fan of bananas, especially in desserts. I do love banana bread though, so I was hoping I'd like this too. I made the loaf last week sometime, and half of it is still sitting on the kitchen bench! Obviously S wasn't a big fan of it either... The taste wasn't too bad, but I thought the chocolate really overpowered the banana and created a weird flavour. Also, I know a few people have been complaining about the cooking time etc, and I agree. The outside was really chewy and hard, while the inside was just cooked (even though I used a tent). Some people say it has to do with the number of bananas you use, and also how old they are. Mine were bananas I had in the freezer that had almost gone black. I used 2 small-medium ones and I think that worked well. Anymore, and the cake wouldn't have cooked inside at all.

Thanks to Ashlee of A Year In The Kitchen for choosing this weeks recipe. Although I probably won't cook it again, I am glad that I did. Doing the marbling was quite fun!